AWD Transaxle and Clutch Replacement
in the Mitsubishi 3000GT/Dodge Stealth

by Jeff Lucius and Ken Wheeler

Chasquido aquí para versión española

Acknowledgments

We would like to acknowledge and thank James Kielma (aka Moparjim) and Greg Mcmahon for their very helpful advice and suggestions. FWD owner Trent Zou (morfinx on 3si.org) contributed the "Morf's FWD Notes" below for FWD owners. These are presented in italics. Hank Semenec contributed some tips for installing the transaxle by yourself.

Overview

Hard launches and stronger engines can increase the stress and wear on the AWD drivetrain, particularly the clutch and transaxle. If you need to repair or replace the clutch, transfer case, or transaxle, these step-by-step instructions should be helpful. Removing and replacing the transaxle realistically requires two people but is possible for one person and clever use of a hoist and a jack. Air tools may be essential for loosening nuts and bolts on the exhaust system, suspension components, and drivetrain cases. The hundreds of dollars you save doing the work yourself will easily pay for a compressor and a decent collection of air tools. You will also need an assortment of wrenches and sockets ranging from 10 to 17 mm, low- and high-range torque wrenches, a wooden or rubber mallet, long heavy-duty screwdrivers and/or pry bars; a clutch alignment tool; a transmission jack (about $20 for a 24-hour rental or about $250 to buy), a hydraulic floor jack, 3 jack stands, and fresh gear oil for the cases. We imagine that a first timer will need about 8 to 10 hours of diligent work to remove and replace everything (double that time for casual effort or to allow for problems). It will take a shop about 1 hour to perform a two-step re-surfacing of the flywheel if you need that done (be sure the shop will be open when you need them). Unless you are very familiar with this car or have a photographic memory, you may want to keep the various nuts, bolts, and parts sorted, bagged, and labeled to avoid confusion when re-assembling the car. All pictures are located at the end of this document.

WARNING. Asbestos may be contained in the dust produced by clutch wear. DO NOT blow the dust out with compressed air and DO NOT inhale the dust. DO NOT use gasoline or petroleum-based solvents to clean out the dust. Use brake system cleaner and a rag to clean the dust off of clutch components and the inside of the housing. Properly dispose of the contaminated rags and cleaner.

Clutch - description and operation

The clutch used in the Mitsubishi 3000GT/Dodge Stealth manual transmissions is a single, dry-plate, diaphragm-spring, flexible type clutch. The clutch disk is a steel plate with friction material riveted or bonded to the flat surfaces. The clutch disk has a splined hub that slides along the splines of the transaxle input shaft. There are four or more torsional dampener springs that allow some twisting between the hub and plate and isolate the transaxle gears somewhat from the engine torque impulses. The clutch disk is sandwiched between the flywheel, which is mounted directly to the engine, and the pressure plate mounted in the clutch housing, which is also attached to the flywheel and spins with it. Spring pressure in the pressure plate diaphragm holds the pressure plate firmly against the clutch disk and the clutch disk firmly against the flywheel. Unlike many others, the flywheel does not have a pilot bearing in its center to support the transaxle input shaft.

Our cars use a vacuum-assisted, hydraulically-operated clutch release system. When pressure is applied to the clutch pedal, the pushrod inside the release cylinder pushes against the outer end of the release fork. Then, the inner end of the release fork pushes against the release bearing which slides on the input shaft and applies pressure to the pressure plate diaphragm fingers. The diaphragm spring then pulls the pressure plate away from the clutch disk, releasing the clutch and removing torque transfer from the engine to the transaxle.

AWD Component weights

Part  lbs (kg) 
 Transaxle 125 (57) 
 Transfer case (5-spd)  24 (11) 
 Flywheel  21.5 (9.7) 
 Clutch housing 15 (6.8) 
 Clutch disc 5 (2.3) 

Troubleshooting

For a concise guide to troubleshooting basic clutch and manual transmission problems, click on this link provided by iCARumba.

Pre-removal

Before proceeding, place the car where it may have to remain for 8 hours or longer. Choose a level surface and if possible one protected from the weather. Make sure the ignition is turned off and the windows up or down, depending on your preference.

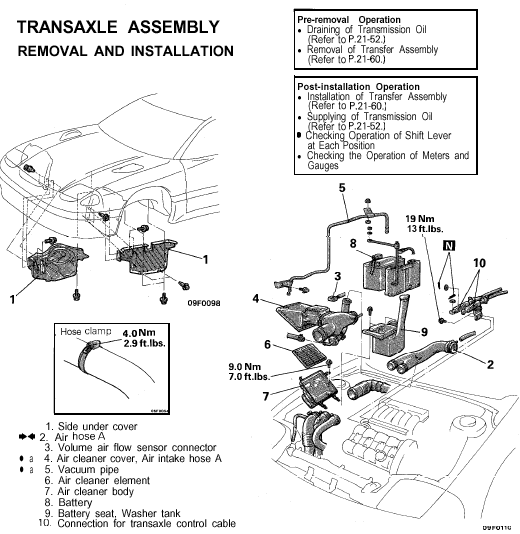
1. Air filter, MAS, and some intake hoses. Disconnect the mass air sensor (MAS) electrical connector. Remove the air filter assembly and MAS. This is fairly easy with aftermarket setups and bit more trouble with the stock setup. For the stock setup, remove the air cleaner body also. This is the lower part bolted to the body. Remove the big intake hose that the MAS connects to. Now would be a good time to clean the air filter if it needs it.

2. Air pipe. Remove the small-diameter metal air pipe (for the clutch air reservoir) that runs across the battery. Spring clamps hold it onto rubber hoses at each end.

Morf’s FWD Note: Skip this step for FWD.

3. Battery. If you need radio security codes be sure you have them before proceeding. First disconnect the negative terminal then the positive terminal. Remove the battery tray and the washer tank. Disconnect the washer tank hose and motor wires at the connectors near the strut tower. Now will be a good time to clean this area up if battery acid has leaked out. The battery tray can be sanded and sprayed with glossy black Rustoleum to restore its appearance.

4. Y-pipe and intercooler hose. Remove the Y-pipe that connects to the throttle body. Remove the intercooler hose that goes from the Y-pipe to the pipe near the top of the radiator (that goes to the driver's-side intercooler).

Morf’s FWD Note: Skip this step for FWD.

5. Transaxle control cables. Remove the cotter pins (replace with fresh ones later) and the 2 bracket bolts. Later you will have to move these cables out of the way to near the firewall.

Morf’s FWD Note: These are near the front of the transmission.

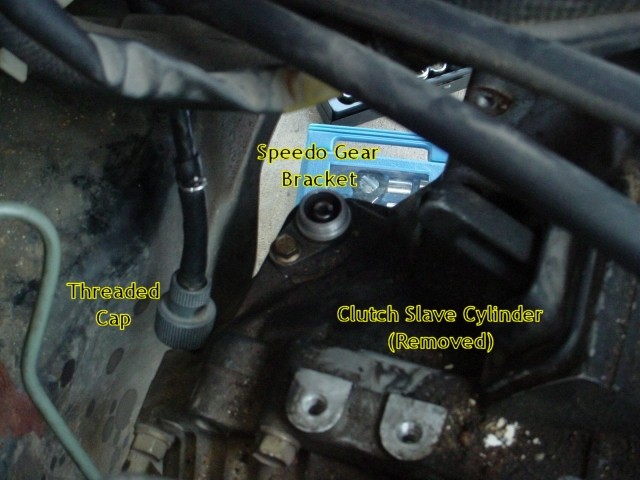
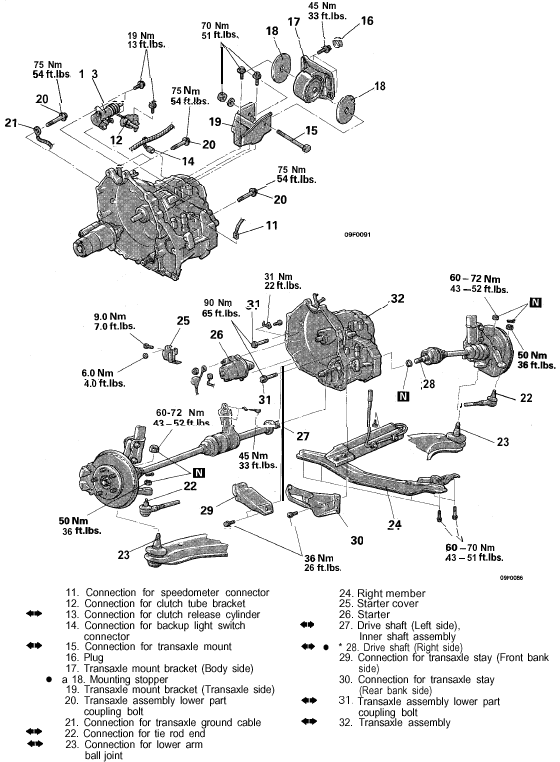
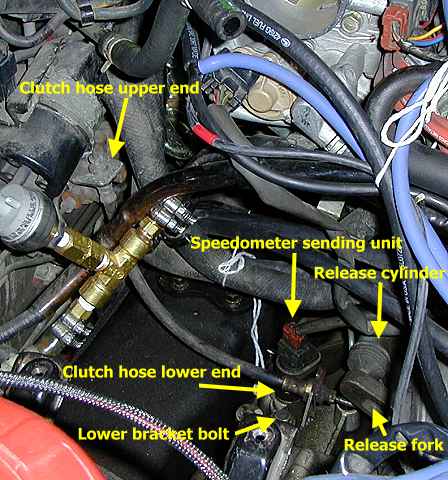
6. Clutch release cylinder. Remove the slave cylinder (2 bolts) and bracket (1 bolt). While holding the piston compressed into the cylinder, wrap with tape to keep the piston compressed.

Morf’s FWD Note: It’s near the back of the transmission, light blue in color. You can just remove the 2 bolts and push the slave cylinder and hydraulic lines aside. It’s not necessary to completely disconnect it. I didn’t keep the piston compressed, it still works fine. You may need to bleed your clutch if you don’t keep it compressed though.

7. Speedometer connector. Disconnect the speedometer gear on the rear of the transaxle by rotating the threaded cap counterclockwise. Remove the small pin that remains in the transaxle-side of the connector and store it is a safe place. Alternately, you can disconnect just the electrical connector from the speedometer gear. There is a thin wire clamp holding the electrical connector together; pry it off with a thin bladed pocket knife or screwdriver. This is the gear that you want to replace to change to 28/36 gearing from the stock early-model 27/36 gearing.

Morf’s FWD Note: It’s close to the slave cylinder. I found the wire clamp to be impossible to remove. Just rotate the threaded cap to remove the connector. I did not see any pins


8. Backup light switch. Disconnect this electrical connector on the front side of the transaxle. This can also be done later with the car up on jacks and lower plastic covers removed.

Morf’s FWD Note: Took me awhile to find this one. It’s a black electrical connector in the top front of the transmission, toward the passenger side.

9. Raise car. If you are not using a lift, then raise the front of the car high enough so that it can rest safely on the highest jack stand position. There is a good jacking point in the center of the front frame cross member. Place the jack stands under the raised metal ridge along the side sills just behind the front wheel wells. Carefully place a piece of wood on each jack to distribute the pressure. Slowly lower the car into the stands. Be careful to not let the wood blocks compress the side plastic panels. Be very sure the car is stable before proceeding. Use the parking brake.

10. Wheels, plastic covers, and IC hoses. Remove both front wheels. On the passenger's side, remove the two plastic covers in the wheel well. Remove the middle plastic covers and flat metal bar under the engine compartment. Also remove the wide plastic cover under the front of the transaxle. You will now want to remove the two hoses that connect to the passenger's side intercooler.

Morf’s FWD Note: I did not encounter any flat metal bars under the engine compartment other than the cross member. There are no intercooler hoses to remove for FWD.

11. Downpipe. Remove the two nuts holding the front pre-cat to the exhaust housing. Remove the two nuts holding the downpipe to the rear pre-cat housing. Remove the bolts from the bracket that supports the main catalytic converter. There should be enough flex in the exhaust system now to slide the downpipe off its hanging bracket and to let it rest on the floor.

12. Frame members. Unbolt the passenger's-side frame member and remove it with the clutch vacuum reservoir attached. Remove the driver's-side frame member.

Morf’s FWD Note: There is no clutch vacuum reservoir for FWD, just disconnect both frame members.

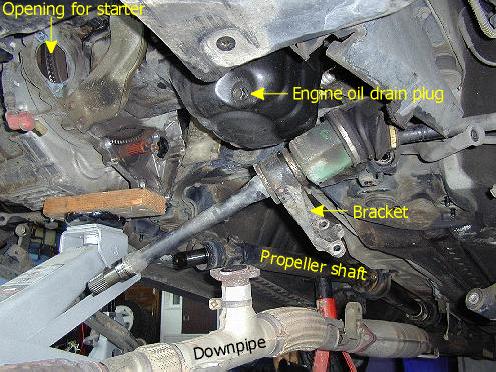
13. Starter. Remove the shield over the starter (2 10-mm bolts). Disconnect the wires. Later you will pull these up and place out of the way near the firewall. Unbolt the starter (2 14-mm bolts) and remove.

Morf’s FWD Note: I did not have a shield over the starter. Other than the 2 14mm bolts, you also need to remove the red nut that holds the power cable to the starter. I think it’s 12mm.

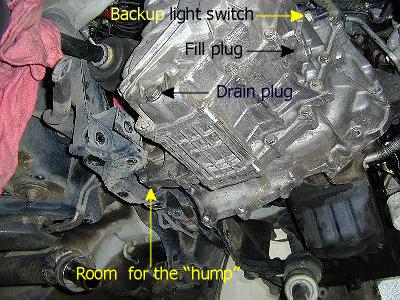
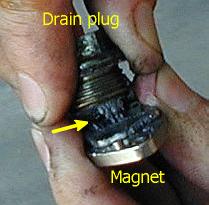
14. Fluids. Drain both the transfer case and transaxle. Do not re-use the fluids. Clean the metal filings and sludge off the drain plugs and put them back in. A strong magnet may be helpful in drawing the filings off the drain plug magnet. You will have an opportunity later after these two cases are off the car to further drain fluid out.

Morf’s FWD Note: You do not have the transfer case to deal with, so just drain the transaxle. The drain bolt is on the passenger side of the transmission and it is 24mm. If you do not have a 24mm socket, you can purchase one at Sears for about $7-8.

15. Transfer case. Place a jack stand under the propeller shaft (front section of the driveshaft). Remove the five 17-mm bolts (3 long, 2 short) holding the transfer case to the transaxle. Loosen the transfer case from the transaxle gently with a large screwdriver or pry bar. Carefully slide the transfer case off the propeller shaft. Some fluid will leak out so you may want to use a pan or rags to minimize the mess. Inspect the splines and seals in the transfer case for wear or damage. Drain the rest of the fluid out of the transfer case.

Morf’s FWD Note: Skip this step. FWD does not have a transfer case.

Removal

1. Transaxle mount bracket. Place a transmission jack under the transaxle. A regular hydraulic floor jack will do but it really needs the wide plate found on a transmission jack. In the passenger-side wheel well, remove the 4 grommets and the 4 bolts holding the body side of the bracket. You may need to raise the transaxle up a bit to keep the bolts from binding. In the engine compartment, remove the nut on the front side of the long bolt going through the mounting bracket, then the bolt itself. Remove the wiring harness bracket attached to the top of the mounting bracket and remove the body-side piece of the bracket. Now unbolt and remove the transaxle side of the bracket.

Morf’s FWD Note: Get a transmission jack if you can. It’s tricky to balance the transmission on a floor jack due to its weight, size and irregular shape. I did not see the 4 grommets and 4 bolts on my transaxle.

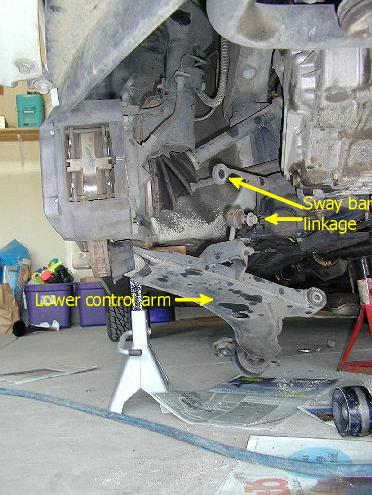
2. Lower control arms. Do this step for both front wheels. Remove the sway bar linkage nut. Remove the two bolts (one long and one short) and the two nuts from the rear bracket for the control arm. This loosens the arm enough to allow removal of the front bolt. Remove the bolt that goes through front piece of the control arm. You may need a pry bar for this. Pull the control arm loose and let it hang.

Morf’s FWD Note: The “rear” bracket is if you are looking at it from the front of the car.

3. Passenger-side driveshaft. Have one person support the driveshaft and pull out on the hub and brake rotor assembly while another person carefully pries the driveshaft out of the transaxle with a bar. There is a spring C-clip that holds it in. The manual recommends that the C-clip be replaced with a new one. Be very careful of the seal and shaft splines when sliding the driveshaft out. Wrap the splines with a towel for protection and let the driveshaft assembly rest on the transaxle.

4. Driver-side driveshaft. Remove the two 14-mm bolts from the bracket that holds the intermediate piece of the shaft to the engine. Pry the bracket loose from the engine and rotate it out of the way. Have one person pull out on the hub and brake rotor assembly (a lot) while the other person guides the shaft out the transaxle. There is no C-clip on this side. Again, be careful of the seal and splines. Let the driveshaft assembly hang out of the way below the engine.

5. Coupling bolts. The only thing holding the transaxle to the engine now is the mounting or coupling bolts. All bolts are easy to get to except the one that is accessible only by going through the front engine mount bracket. Remove all of the bolts. The one inside the engine mount bracket can be left in there. There is a grounding strap attached to one of the bolts near the starter. You may also want to remove the two stays (brackets) that connect the lower part of the transaxle to the front and rear of the engine block. There is a thin dust shield that is held on with two small bolts that can be removed also. You may have to pry on the transaxle to break it loose from the engine. Be sure that your transmission jack it situated properly.

Morf’s FWD Note: Be sure to remember which bolt the grounding strap connects to. There is a hole on the drive- side of the front motor mount bracket. That’s where the hard-to-get- to transmission bolt is located. Use a 3 inch extension on your ratchet to access the bolt from under the car.

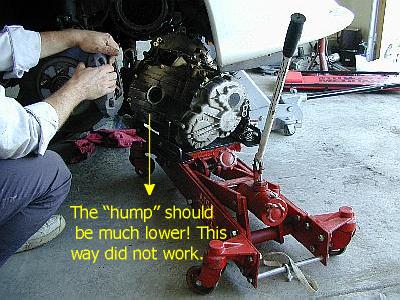
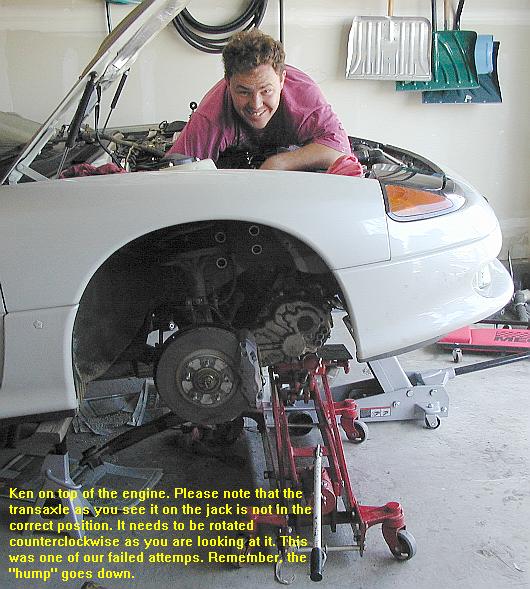
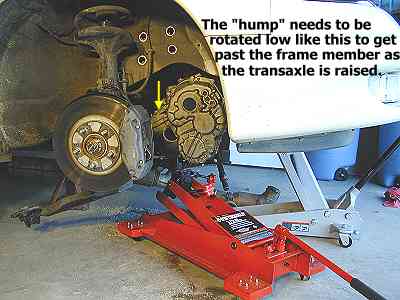
6. Lower the transaxle. Before lowering the transaxle, be sure that all hoses and cables are set aside and tied off if necessary. We found it easiest to use the following system for both removal and installation of the transaxle. Using the front jacking point and hydraulic floor jack, raise the car as high as you can (a small piece of 2x4 wood may help). The parking brake is set securely right? Place a pile of rags or a cushion on the intake plenum and have one person lay across the engine so that he or she can control the movement of the transaxle away from the engine, rotate the top toward the rear of the car, and help guide it through the curve in the large frame cross-member near the rear of the transaxle. You have to rotate the rear end of the transaxle down a little after clearing the clutch cover assembly to get it through the frame member. Be careful to not place your fingers where they might get pinched. This same advice applies to the jack handler. A second person controls the location and height of the transmission jack, which has four caster-type wheels so it rolls easily in any direction. After the jack and transaxle have been lowered all the way, a third person (or the person that was up on the engine) helps guide the transaxle out through the wheel well opening. We did not find it necessary to remove the transaxle from the jack to get it out from under the car. Once the transaxle is away from under the car, lower the car carefully back onto the jack stands.

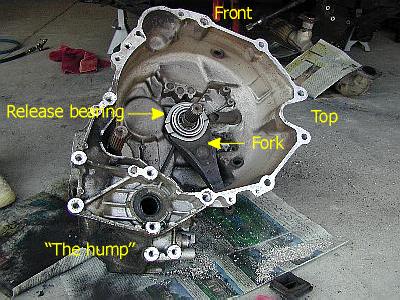
Take the transaxle to an area where it is safe to wipe off the dust that has accumulated in the housing from clutch disc wear. DO NOT blow the dust out as it may contain asbestos. Use brake system cleaner (NOT gasoline or petroleum-based solvents) on a rag to clean out the housing. Now is a good time to drain the oil if you have not done so already or try to drain some more oil out if drained earlier. Inspect the seals where the driveshafts insert into the transaxle and replace if necessary. Inspect the center shaft (the output shaft to the transfer case) for wear or damage. A little rust on the surface is normal. Remove the release fork boot and take out the release fork with the release (or throw-out) bearing attached. Replace the release bearing with a new one after placing a small amount of grease onto the inner surface that slides on the transaxle input shaft (you do not want grease being flung off the shaft and onto the clutch disc). Do not re-use the release bearing and do not attempt to clean the release bearing with cleaning solvent. Mitsubishi recommends "MITSUBISHI genuine grease Part No. 0101011 or equivalent" and Dodge recommends "MOPAR multi-mileage lubicant Part No. 2525035 or equivalent". Apply a small amount of grease to the fulcrum that the release fork pivots on and to the outer end of the fork that contacts the release cylinder pushrod. Re-install the release bearing, fork, and boot.

Mitsubishi claims that the transaxle must be returned to them if it needs repair, meaning that they will sell you a new or rebuilt unit in exchange. However, you also have the option of buying new aftermarket parts and used parts to have a local transmission shop rebuild the transaxle for you. You need to be aware that the original 5-speed transaxles use an 18-spline center shaft to send torque to the transfer case. Later 5-speed models and all 6-speed models use a 25-spline center shaft. If you replace the transaxle, the transfer case must also be the appropriate 18- or 25-spline model. In addition, the 5-speed and 6-speed transaxles, and the transfer cases for each type of transaxle, are not interchangeable because of differences in the gear reduction ratios.

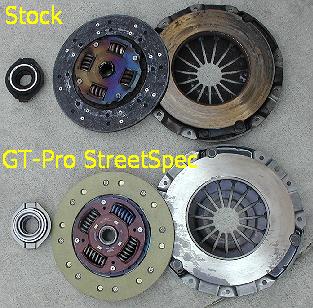
7. Clutch assembly. Diagonally loosen the bolts that attach the clutch cover to the flywheel to avoid bending the cover flange. Remove the cover and clutch disc. Do not attempt to clean the clutch disc with cleaning solvent. If the clutch disc is worn, replace with a new or re-built unit. New clutches are available from Mitsubishi (can be less than $300), and from the following manufacturers: Centerforce (Dual Friction, ~$500), RPS (Turbo and Turbo Carbon Stage II and III, ~$400-$550), GT-Pro (StreetSpec and other custom units, ~$500), Clutch Masters (Stage 1, $567, to Stage 4, $721), ACT (~$700-$800), Unorthodox Racing Ultra Grip Stage 2 (~$1250 with lightweight aluminum flywheel), and Mueller (Redhead Dual Friction, about $2000). The RPS Turbo Carbon Stage III (a 6-puck disc, 3 carbon and 3 ceramic, with a 2900-lb pressure plate) is very-highly recommended for high-output engines by Jack Tertadian, who owns and races one of the fastest VR4s on the planet. The stock pressure plate has a 2024-lb setting load.

Morf’s FWD Note: For FWD, I’ve seen a lot of people use RPS, SPEC, ACT, or Southbend, I used Southbend DxD 6-puck.

8. Flywheel assembly. Diagonally loosen the bolts that attach the flywheel to the engine and remove the flywheel. If the flywheel is worn, then it must have both surfaces milled (also called re-surfacing). The proper re-surfacing proceedure for our flywheel is called "2-stepping". This re-surfaces (smooths and flattens) the area that the clutch plate makes contact with. The 2nd step shaves the same amount of material from the small "arms" that the pressure plate screws into. If the 2nd step is not done, the area that the clutch plate goes in is now deeper and your clutch will slip. Make sure your shop knows what "2-stepping" is. In the Denver, CO area, Lakewood Auto at Colfax and Depew is highly recommended. The cost for "2-stepping" your flywheel can range anywhere from $22 to $40. Lakewood Auto charged $35, was knowledgeable, friendly, and had the work done in about an hour. A few people advised to have the flywheel balanced. After a little research it was found that this is generally not necessary. Mitsubishi did a good job balancing our flywheels from the factory; you can see the balancing holes in the pictures below. Flywheel balance jobs are usually done with a lower end rebuild and are balanced along with the crankshaft and harmonic balancer. Some aftermarket flywheels (Mueller for example) offer weight reduction to about 15 lbs.

Installation

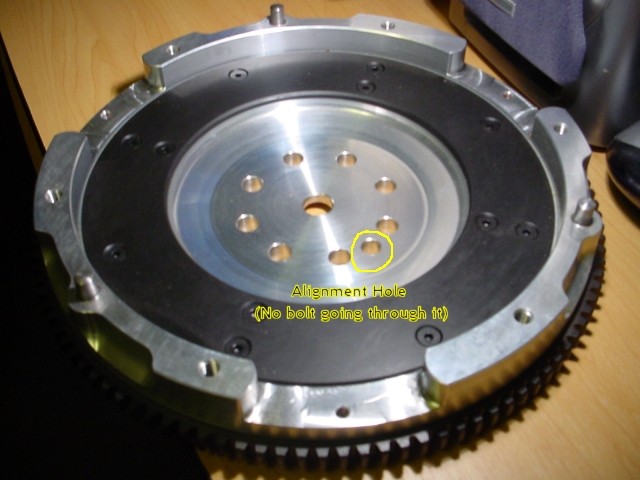
1. Flywheel assembly. Place the flywheel onto the engine using the alignment pin. Once the flywheel is tight against the engine, insert the 8 14-mm bolts and tighten in a diagonal pattern to 54 ft-lb (75 Nm) torque.

Morf’s FWD Note: There is one hole on the flywheel that does not have a bolt going through it; it is used to line up the flywheel. Line that hole up with the corresponding hole on the engine. After you’ve torqued all the bolts, make sure to re-torque each of them one more time.


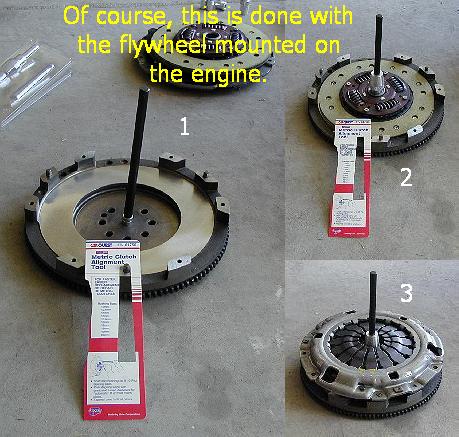
2. Clutch assembly. Before installing the clutch be sure that it will slide onto the input shaft in the transaxle. We have experienced aftermarket clutches that have closer tolerances than the stock clutch so are more difficult to slide onto the input shaft. Press the clutch on and off the input shaft a few times if necessary. You will need a clutch alignment tool of some sort to insure that the clutch will be in the proper location to receive the transaxle input shaft. We used a "universal" Metric Clutch Alignment Tool available from CarQuest (part number STL 61750, about $24). Place the clutch onto the flywheel and insert the alignment tool to center the clutch disc on the flywheel. Press on the clutch cover assembly, which aligns using three pins. You will probably need to tap the cover assembly with a mallet to snug it up. Tighten the 6 12-mm bolts a little at a time working in a diagonal pattern. Torque these bolts to 13 ft-lb (18 Nm). Remove the alignment tool.

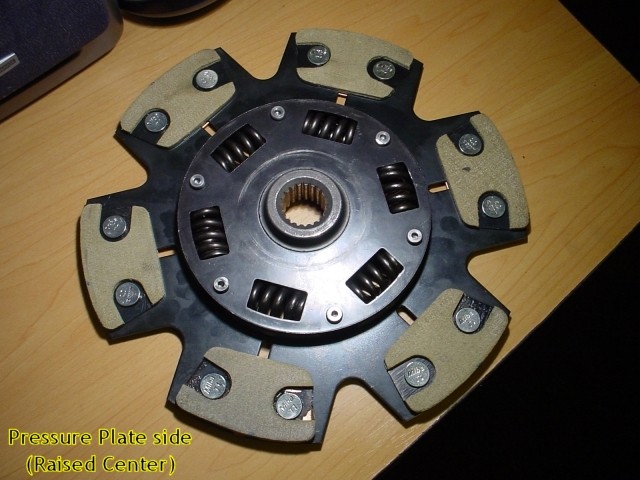
Morf’s FWD Note: The pressure plate side of the clutch disc is the raised side. MAKE SURE you do not install the clutch disc backwards. Again re-torque all the bolts after you torqued them the first time around.


3. Transaxle and coupling bolts. We found it interesting that the service manual does not mention anywhere how to actually remove and install the transaxle, just what parts to remove before you attempt to do so. We tried various tactics unsuccessfully before developing the method that we present here. Place the transaxle onto the transmission jack. Adjust the transaxle so that the "hump", where the driveshafts and transfer case attach, is in its normal mounted orientation; this is only to allow the transaxle to fit through the wheel well. Jack the car up again so that the transaxle and jack can squeeze between the hub and rotor assembly and front bumper. Be careful to not damage the front bumper skin with the shift levers or to bend the sway bar. The passenger's-side driveshaft should be tied up so that it is above the transfer case; protect the splines with a rag. It will ride up on top of the transmission as you are putting it in.

Again, have a person lay across the engine to 1) help rotate the transaxle so that the hump is down, 2) guide the transaxle past the frame cross member (where the control arm attaches), and 3) rotate the back of the transaxle and hump up as the other person moves and raises the transaxle. Work together so that no fingers get pinched. Align the bell housing as best you can with the engine; the mounting bolts should line up and the housing will be about 1 inch from the engine. The input shaft will be inside the pressure-plate fingers; this can be verified if desired by removing the rear rubber breather cap and looking inside the housing with a flashlight. If the clutch has been aligned properly using the tool, then the transaxle should easily slide over the housing and tight against the engine. If the clutch fits tightly on the shaft (remember you prefitted the clutch earlier?) one person may have to apply pressure on the outside of the transaxle toward the engine while the person on the engine carefully aligns the transaxle. The jack is below the transaxle at all times supporting the weight.

The person on top can then insert the top four 17-mm coupling bolts and tighten by hand. The transaxle may have to be raised or lowered slightly to achieve proper alignment of the bolts. Once the top four bolts have been inserted completely by hand, the jack can be removed and the car carefully lowered back onto the jack stands. Insert the remaining coupling bolts and tighten to 55 ft-lb (75 Nm) of torque. There is a flat piece of tin (the dust shield) that will have to be re-installed near the starter. Do not forget the ground strap attached to the starter wiring harness. The two stays can be put back on if removed earlier.

If you have trouble with this technique, or must work by yourself, then the following advice from the 3SI message board members may be helpful. They recommend suspending the transaxle, with ratcheting straps, from an engine hoist or a strong wooden board that straddles the plenum and wheel well. A standard floor jack can be used for support from below. If the clutch is not precisely aligned, then the transaxle may be a bit more difficult to bolt up. The longer bolts from the transfer case may help to draw the housing up to the engine.

Here are more tips if you are stuck installing the transaxle by yourself from Hank Semenec.
Morf’s FWD Note: There is no “hump” on the FWD transaxle. The best way to do it is to raise the transmission up with your jack to about to the same height as the engine, then man-handle it onto the engine. It will take a lot of wiggling, cussing and sweating before things line up. You did use the alignment tool didn’t you? Because if you didn’t, you are not going to make it work no matter how hard you try.

4. Passenger-side driveshaft and lower control arm. One person needs to pull out on the hub and rotor assembly as the other person guides the driveshaft carefully back into the transaxle. Did you use a new C-clip? Turn the rotor to help align the driveshaft splines. Be sure that the driveshaft is completely inserted into the transaxle. Re-attach the control arm starting with the long front bolt (threads go toward front of car). You may need to wiggle the arm a bit and use a mallet to get the bolt fully inserted. Add the (new) lock washer and tighten the nut to 80 ft-lb (108 Nm) torque. Install the 2 nuts (use 29 ft-lb, 40 Nm torque), long bolt (72-87 ft-lb, 98-118 Nm torque), and short bolt (66 ft-lb, 90 Nm torque) to attach the rear piece of the arm to the frame.

5. Driver-side driveshaft and lower control arm. Repeat the instructions above for the driver's-side driveshaft with the addition of re-attaching the support bracket to the engine with the 2 14-mm bolts (33 ft-lb, 45 Nm torque). There is no C-clip on the driver's-side driveshaft.

6. Transaxle mount bracket. Install the transaxle-side piece of the bracket. Torque the 2 bolts to 51 ft-lb (70 N-m). Insert the body-side piece of the bracket. It can be inserted upside down but the holes will not line up with the holes in the body. Are both rubber stoppers still there? Insert the long bolt to couple the pieces (threads toward front of car) and add the (new) lock washer and nut (51 ft-lb, 70 N-m torque). Install the bolts through the fender. You may need to move the transaxle slightly with the jack and/or a pry bar to get the openings to line up. Torque the 4 bolts to 33 ft-lb (45 Nm). Install the four grommets.

Morf’s FWD Note: Remember to re-attach the grounding strap to the proper bolt.

Post-installation

1. Transfer case. Carefully slide the transfer case onto the propeller shaft. Attach the transfer case to the transaxle using the 5 17-mm bolts (3 long and 2 short). Torque the bolts to 18-22 ft-lb (24-30 Nm).

Morf’s FWD Note: Ignore this step.

2. Starter. Install the starter (2 14-mm bolts), wires, and cover plate (2 10-mm bolts).

Morf’s FWD Note: Install the starter and the wire, no cover plate.

3. Backup light switch. Plug the backup light switch connector back in (front of transaxle above starter).

4. Downpipe. If the two exhaust gaskets for the downpipe are in good shape then re-use, otherwise replace with new factory gaskets (Mitsubishi part number MB 687002). Slide the downpipe back onto the hanging bracket/hook. Bolt the support bracket for the main cat back on (10 ft-lb, 13 N-m). Bolt the downpipe back onto the two exhaust housings (torque nuts to 37 ft-lb, 50 N-m).

Morf’s FWD Note: This step is simple enough. It would be a good time to replace the downpipe with an aftermarket one and/or replacing the oxygen sensor. For the oxygen sensor, just pull the rubber grommet loose and disconnect the electric connector.

5. IC hoses, frame members, plastic covers, and wheels. Install the two hoses that attach to the passenger's-side intercooler. Install both plastic covers in the passenger's side wheel well. Install the left and right frame members, tightening bolts to 44-52 ft-lb (60-70 Nm). Install the plastic covers and metal support bar under the front of the engine compartment. Install both front wheels, tightening the lug nuts in a diagonal pattern. If you can, torque lug nuts to 88-103 ft-lb (120-140 Nm).

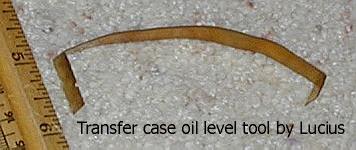
6. Fluids. The manual recommends MOPAR Hypoid Gear Oil or equivalent with API classification GL-4 or higher and SAE 75W-85W weight rating for both the transaxle and transfer case. We used Red Line synthetic gear oil, a 50/50 mix of MTL and MT-90. If Red Line oil is not used, BG concentrate can be added to the cases for smoother operation. Jim Rowe at Metric Mechanic recommends Amsoil 10W-40 fully synthetic motor oil for the transaxle. The AWD transaxle holds 2.5 quarts (2.36 L); the 5-speed transfer case holds 0.29 quart (0.27 L); and the 6-speed transfer case holds 0.32 quart (0.30 L). You can buy a pump attachment at the auto parts store that will thread onto the standard gear oil bottle to make adding oil easier. You do not want to overfill either case. If the transaxle is over full, then oil may leak out through the driveshaft seals, generally without damaging the seals. When the car is level, the oil inside the transaxle should just reach the bottom of the filler hole. For the 1991 and 1992 transfer cases, the oil level should be 0.43-0.51 inch (11-13 mm) below the filler hole. Pictured below is a tool that Jeff made using a thin piece of brass to measure the transfer case oil level. It is 3/8 inch wide with a notch at the 0.5 inch level on the piece that inserts into the case. For 1993 and later transfer cases, the oil level should be at the bottom of the inspection hole. Tighten the drain and filler bolts to 18-22 ft-lb (25-30 Nm). More details on changing the drivetrain fluids are at my web page 2-awddrainfill.htm

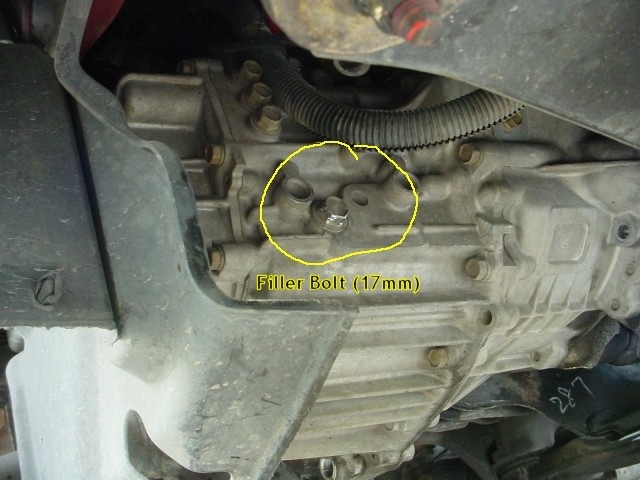
Morf’s FWD Note: The filler bolt (17mm) is in the front bottom of the transaxle. It’s been reported by many people that the fill plug is very difficult to dislodge. I was not able to remove it with a 28” breaker bar. Instead I stripped the outside of the bolt. If you are one of the unfortunate few that cannot bust the filler bolt loose, you may fill up the transaxle through the speedometer gear hole. Remember where you pulled the threaded cap? Unbolt the 10mm bolt next to it, rotate the bracket and carefully pull up. An helical gear is connected to the bracket and will not pull out unless you rotate it just the right way. Once the helical gear is removed, there should be a hole big enough to stick a funnel in. Fill it up with 2.4L of transaxle fluid. I used Pennzoil Synchromesh; some others will recommend Redline.


7. Lower the car, check lug nut torque. Raise the car a little and remove the jack stands. Lower the car to the ground. Check the lug nuts again to be sure they are tightened to 88-103 ft-lb (120-140 Nm).

8. Speedometer connector. Install the speedometer gear and small pin or re-connect the electrical connector.

Morf’s FWD Note: If you used the speedometer connector hole to fill up the transaxle fluid, reinstall the helical gear, 10mm bolt, and threaded cap.

9. Clutch release cylinder and control cables. Install the clutch slave cylinder and the two control cables. Use new cotter pins on the cables. Tighten all bolts to 13 ft-lb (19 Nm).

10. Intercooler hose and Y-pipe. Install the front, top intercooler hose and the Y-pipe that it attaches to.

Morf’s FWD Note: Skip this step.

11. Battery. Reconnect the washer tank hose and wiring harness. Install the battery tray, with washer tank attached, and battery. Reconnect the battery cables - positive first and negative last.

13. Air pipe. Install the air pipe for the clutch vacuum tank. You would think there would be a cleaner way to route this pipe and hose.

Morf’s FWD Note: Skip this step.

14. Air filter, MAS, and some intake hoses. Install the air hose, MAS, and filter assembly. Do not forget to plug the MAS back in.

15. Inspection. Before you rush to start the car and test your handiwork, take the time to look around for any parts that are "left over" or tools laying around plus to be sure that you added oil to the cases. Be sure that the clutch pedal operation is as described in the manual and that the engage and release points are at the right places.

Manual page 1 Manual page 2

Clutch hose in car

Transmission on

Drain plug

Transmission insides

Passenger's-side lower control arm

Driver's-side driveshaft

Transaxle on transmission jack just through wheel well

Ken on engine

Transaxle on transmission jack ready to raise


Universal clutch alignment tool

Transfer case oil level tool


Back Home Forward

Except for the small gif and jpg images, the content, images, photographs, text, and multimedia displayed are Copyright ©2000-2004 by Jeff Lucius and Ken Wheeler. All rights reserved. No part, section, image, photo, article, or whole of this site may be reposted or redisplayed without permission of the authors.
Page last updated December 8, 2004.