Scanmaster 3 Installation in the
1991-1993 Mitsubishi 3000GT and Dodge Stealth
by Jeff Lucius
Introduction
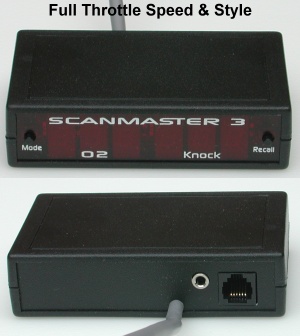 These instructions will help you install the Full Throttle Speed and Style Scanmaster 3 in the 1991-1993 Mitsubishi 3000GT or Dodge Stealth . The Scanmaster 3 is a portable scan tool for monitoring and relaying data retrieved from the engine control unit (ECU) on 1991-1995 DSM cars and 1991-1993 Mitsubishi 3000GT/Dodge Stealth cars (with Mitsubishi OBDI-style ECU connector and dianostic port). It can be "permanently" mounted and left connected to the diagnostic port. It does not activate the ABS diagnostic mode, like some cables and devices do, so that ABS is not disabled. The unit can pass the ECU data through an RS-232 serial port (RJ-11 phone jack) to either a laptop or PDA, which can run datalogging software. The presence of the Scanmaster is transparent to the software. There is also a 3.5-mm jack for connecting two 0-5 volt external analog signals.
The default display shows the rear (left bank) oxygen sensor signal and the ECU knock count. Pressing the mode button during operation will sequentially present other ECU data such as RPM, timing advance (either in "DSM mode" or "3S mode"), airflow (Hz), fuel trims, injector pulsewidth or duty cycle, battery voltage, ISC steps, and much more. The front bank O2 sensor signal is not available for display but is passed through to an optionally attached datalogger. Check engine light codes can be displayed and cleared. Vehicle speed is monitored through diagnostic connector terminal 11, and so 0-60 mph time and 1/4-mile elapsed time can be displayed. The external analog signals can be displayed and passed through using substitution to dataloggers. The various display options and substitutions are set by placing the unit in configuration mode during power up. Complete instructions and information are in the operation manual (scanmaster3_manual_1.pdf) or (scanmaster3_manual_1-1.pdf).
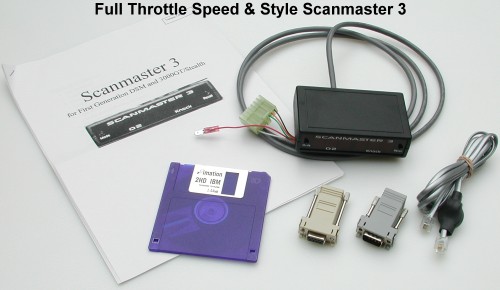
For $250, the basic kit includes the items shown below. The floppy disc contains the operation manual in PDF format (you will need the Adobe Acrobat Reader to view it), PC (DOS-mode) software to flash-upgrade the firmware, and a copy of the MMC MMCd datalogging software. One of the RJ-11 to DB9 adapters (female) is for connecting to a PC (usually a laptop) and the other adapter (DB9 male) is for connecting to a PDA (usually a Palm) serial hotsync cable. Full Throttle offers a cable for LM1 wideband oxygen sensor input, as well a 3-bar MAP (boost) sensor and harness for use on the EGR temperature wire (Federal models only).
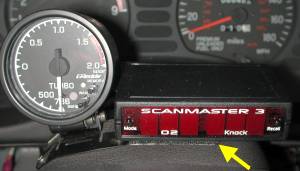
The Scanmaster 3 can be installed without the use of tools. However, if you want to connect the power wire to the car's harness rather than the fuse block, the tools and supplies needed include: some male and female disconnect terminals (insulated spade or bullet type) sized for 18-20 gauge wire, a wire cutter/stripper/crimper tool, some insulated 18 AWG multi-strand wire, a few cable ties, electrical tape, a volt-ohm meter (to check your connections), and Philips and slotted screwdrivers. You can decide where to best mount the Scanmaster 3. I used Velcro to attach it to the top of the steering column cover, next to my boost gauge. If you have not made power and ground connections in your car yet, then take a look at my web page 2-wiring-tips.htm for some tips on making these first connections. Please read all of these instructions before beginning this procedure.
Mount the Scanmaster 3
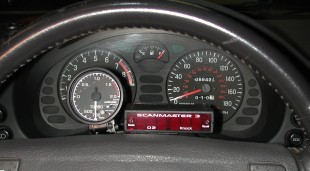
Decide where you want to mount the Scanmaster 3. It should be within easy view of the driver because its purpose is to give real-time readings of knock counts and rear O2 sensor voltage, or other data. It will also have to be within reach of the diagnostic connector (maybe 6 feet). I placed the Scanmaster 3 on the steering column cover using "Industrial Strength" Velcro (bought at Home Depot). I cleaned the surface of the steering column cover and the bottom of the Scanmaster 3 using brake cleaner or electrical parts cleaner (they leave no residue). After carefully determining the location, I cut the appropriately sized pieces of Velcro and attached them to the two surfaces. After attaching the datalogger cable to the unit I placed the Scanmaster 3 on the column cover. To make it easy to route the harness from the top of the steering column to the foot well area and the datalogger cable to the center console, I removed the knee protector assembly. See 2-wiring-tips.htm for how to do this.
Make the Connections
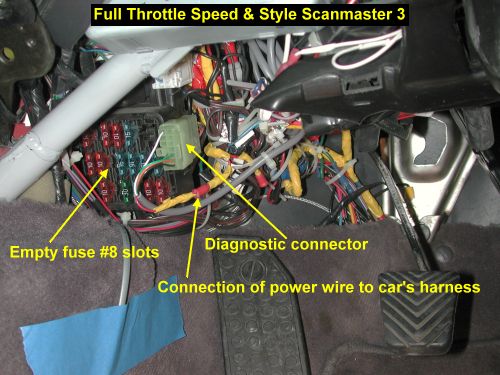
With the knee protector assembly removed, route the harness through the dash wiring and components to the diagnostic port. Plug in the diagnostic connector. The power wire is designed to insert into the top slot of the (unused) #8 fuse location of the multipurpose fuse block the diagnostic connector is attached to. I prefer to connect power wires to the car's harness and so replaced the male quick disconnect connector with a male bullet connector (see 2-crimpterms.htm). This was done before mounting the Scanmaster 3 but could be done in the foot well. Cable tie the harness and its extra length out of the way.
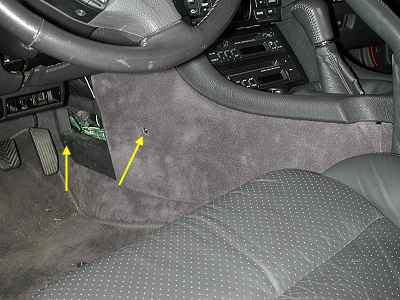
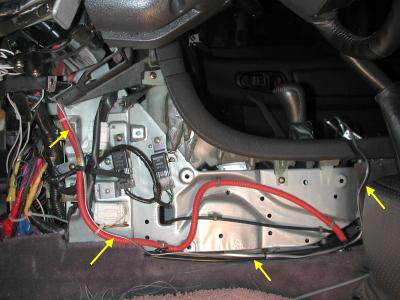
I wanted to partially conceal the datalogger cable and keep it out of the way, so I removed the left side floor console cover. Pry out the plastic plug near the front of carpeted cover. Pry open the cap on the screw in the middle of the cover. Remove the screw. Start at the front of the cover and pull out and down. Route the cable along the existing harness to near the center console. After being sure everything worked, I put the left console cover and knee protector assembly back on.
Discussion
The Scanmaster 3 performs exactly as advertised. Connection is easy and there is little setup required for the control unit. The numbers are large and easy to read. The letters when used can a be a bit criptic but are easy to get used to. When the unit gets power it first displays SCN 3 and then DSM 1.0. Even though I have the unit powered through the IG1 ignition switch, it appears to reset or restart after the engine starter is activated. Once initialization is complete, the unit displays its default settings, usually rear O2 voltage and knock counts. Under certain conditions and for some data, the Scanmaster 3 can recall peak values and car speed at those peaks.
For 3S owners, you will want to enter the Configuration Mode to set the timing advance to 3S mode (10 degrees are subtracted from the ECU timing advance data). One way to enter config mode is to depress both buttons as the unit is powering up, not before it has power, and hold for a second or two until "CFG" appears on the display. The other way to enter config mode is to depress the Mode button for about 15 seconds until "CFG" appears on the display. The Mode button steps you through the configuration options and the Recall button changes the option parameter. To leave config mode step through the config options till all have been displayed or depress the Mode button for about 10 seconds. DSM 1.0 will again be displayed and then the default display parameters.
Version 1.1 of the Scanmaster 3 displays a corrected ignition timing advance. For my 1992 Dodge Stealth TT with baro fixed at 0.81 bar and intake air temp at 94ºF (because of the ARC2-GP) and 550 cc/min injectors installed, I get 17 to 20 (average=18) degrees of advance (the numbers from the ECU) at warm idle according to my Chrysler DRBII. The Scanmaster 3 displays 15º to 18º, so it is subtracting 12º from the value it reads from the ECU. The proper correction factor is -10º. However, the Scanmaster 3 does (by default) pass through the uncorrected values to a datalogger. The original version (1.0) only displays the uncorrected timing advance.
In September 2004 version 1.1 beta was released that provided some interesting upgrades. See post #20 in this thread at 3si.org: http://www.3si.org/forum/showthread.php?p=2368744. The flash file scm3110.zip is also available in my folder http://www.stealth316.com/misc/. Some of the new features include the following (and there are more).
- Display timing advance scaled for 3S cars (as discussed above)
- Display front O2 instead of rear O2 as default
- Send vehicle speed (mhp) to a datalogger as the ISC step signal
- Send vehicle speed (mhp) to a datalogger as the Air Volume signal
- Send acceleration (units unkown) to a datalogger as Accel Enrichment
- Send boost signal from the EGR temp line to a datalogger as the Air Volume signal
Overall, this unit is conveniently sized and fairly priced at $250 (there was a $20 promotional discount offered when I purchased it in August 2004 lowering the price to $230). ECU data, especially knock count, are available for display all the time; no laptop or PDA is required. Auxiliary inputs, such as from a MAP sensor or wideband O2 can be displayed and passed on to a datalogger. The DTI KnockBOX is the only similar unit and it is no competition at all. At this time, the FTSS Scanmaster 3 is superior in every way to the KnockBOX. I highly recommend the Scanmaster 3 to 3S owners.
Page last updated December 19, 2004.

 These instructions will help you install the Full Throttle Speed and Style Scanmaster 3 in the 1991-1993 Mitsubishi 3000GT or Dodge Stealth . The Scanmaster 3 is a portable scan tool for monitoring and relaying data retrieved from the engine control unit (ECU) on 1991-1995 DSM cars and 1991-1993 Mitsubishi 3000GT/Dodge Stealth cars (with Mitsubishi OBDI-style ECU connector and dianostic port). It can be "permanently" mounted and left connected to the diagnostic port. It does not activate the ABS diagnostic mode, like some cables and devices do, so that ABS is not disabled. The unit can pass the ECU data through an RS-232 serial port (RJ-11 phone jack) to either a laptop or PDA, which can run datalogging software. The presence of the Scanmaster is transparent to the software. There is also a 3.5-mm jack for connecting two 0-5 volt external analog signals.


